There’s a new trend in pre-purchase or pre-sale reports called an Invasive Building Report. These “invasive” reports put a camera scope into the wall cavity to obtain a limited view of the cavity between wall studs, dwangs, and the bottom plate. The scope is generally put into the wall through a PowerPoint socket or for homeowners a hole may be cut and a plate placed back over.
The findings can be described as “invasive camera findings”, which will tell you how many areas were surveyed “invasively” and if all-clear that they’re free from mould, decay and moisture, and that the integrity of the exterior wall framing is completely intact.
Not only is this not what the Industry recognise as invasive testing, nor what is meant when recommending a full weathertightness survey; the findings can be dangerously misleading.
It seems we are following a trail of “invasive building reports” that have firstly failed in many instances to identify and document that the home is subject to weathertightness issues and risks, and secondly have advised based on the invasive camera findings that the home is not leaking and the integrity of the exterior structure is fine – which has not been the case.
We have seen reports where it is visible that there is staining or moisture to the bottom plate, only to have it stated that it is a minor repair and the timber is intact. Accredited or Registered Building Surveyors would not rely on this method to make such determinations.
Some of these properties will require recladding and have rot damaged framing with repair bills expected to be upwards of $250,000.
So let’s look at the facts as to why you cannot rely on these invasive camera building reports, starting with pictures that say it all….
Below we can see the exterior of the wall looking fine, and on the right, we get to see the same wall without the cladding. The arrows are demonstrating the limited area a camera scope gets to see in the “invasive” inspection.
The camera can only see the internal plane of the framing, as pictured below.

Here we are looking at the top plane of the bottom plate that sits at the bottom of the wall. You can see the wood looks fine, with no moisture, decay or mould evident.
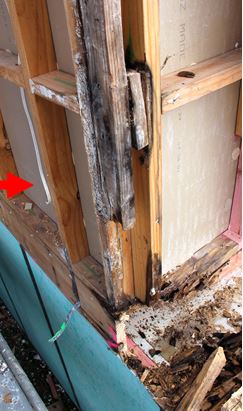
However, now look at the outer and bottom edge of that same piece of framing and you will see it has rotted away.
If you look again at the photo of the wall framing above you might notice that the outside edge of the framing is dark from moisture staining and damage. There can be areas of substantial decay sometimes without elevated moisture readings, or obvious signs of decay, which is why probe testing, drilling samples, and/or cut-outs are needed to reveal the condition of enclosed spaces and hidden components within a building.
Here is the official industry definition of invasive testing1 as outlined by the Department of Building and Housing (DBH).
The DBH advise invasive testing is conducted with the moisture meter where pins are inserted into the timber framing and obtain moisture reading at pre-selected high-risk areas. These areas are pre-determined from the preceding visual investigation of the building assessing its condition and weathertightness risk, with a moisture meter in non-invasive mode, similar to what your Accredited Building Surveyor will be doing when undertaking your Standard compliant survey.
The DBH also advise the full extent of leaks will only be confirmed as areas of cladding are removed in cut-outs carried out for investigation purposes or during repair work. In other words, timber has to be probed to determine if it is wet, or soft, tested to determine if compromised by decay, and may not reveal anything to the eye without removing the cladding.
To be clear, invasive testing uses a moisture meter that invasively penetrates into usually enclosed timber framing to obtain moisture readings. It is used where there are identified risks or issues. The photo to our left shows the cladding removed with extensive rot damaged framing clearly evident. Look more closely and you will note a wire coming down the left of the photo. That wire feeds into the back of a PowerPoint and you can see the entire cavity adjacent to the wiring/PowerPoint looks fine.
Immediately you can see why these “invasive building reports” with a camera scope going into a wall where a PowerPoint happens to be to look at a limited space are NOT what the DBH or Building Surveying industry considers to be invasive.
Chances are if you are currently looking to buy property you will often be presented with a builder’s report. No need for you to get one done, as the author will no doubt be reputable, Inspection Standard Compliant, but mostly, they will not be an Accredited or Registered Building Surveyor. While the report may look impressive, if the author is not the latter, the expertise of the author may be self-proclaimed, rather than industry assessed.
Sadly, these non-Accredited inspectors or unaligned operators can miss a lot because they are not trained in surveying and do not actually recognise the risk or defect that is obvious to the trained Building Surveyor. The ramifications of not-knowing can cost you tens of thousands of dollars if you are lucky, but more likely hundreds of thousands of dollars, when dealing with a leaky home.
If you are ever reading an “invasive building report” from a house inspector, not only is it NOT from a Registered or Accredited Building Surveyor, you really want to be aware that having a camera scope look into a wall cavity preselected by means other than identified risk areas or issues, without moisture testing or sampling, is not an industry-recommended technique, is highly limited, and does not result in an industry recognised invasive building report.
It is our opinion that this type of inspection and reporting is misleading given the industry definitions and expectations. It is our experience, as demonstrated in the photos; relying on such a report can put you at risk of buying a home with real issues while being told its ok.
Footnote:
[1] The NZ Government Department of Building and Housing (DBH) has a guide book – External Moisture – A guide to weathertightness remediation
END


